
|
Mitsubishi Delica Owners Club UK
Mitsubishi Delica L300, L400 and D:5 Owners Club
|
| View previous topic :: View next topic |
| Author |
Message |
jejoenje
Joined: 20 Aug 2016
Posts: 785
Location: Alloa, Scotland
|
 Posted: Wed Nov 11, 2020 10:34 Post subject: Propshaft flange bolts Posted: Wed Nov 11, 2020 10:34 Post subject: Propshaft flange bolts |
 |
|
Does anyone have a clever tip/trick to convincing the propshaft flange bolts to release without snapping off?
Given that we won't be going anywhere any time soon, I thought now would be a good time to work towards replacing the diff pinion seal which has been "weeping" for years.
Spent a good hour or so trying to entice some movement out of the flange bolts. There doesn't seem to be enough room to get a socket on either the nut side (towards the diff - no chance as there just isn't enough room between the companion flange and the diff casing) or the bolt head side. I can *just* get the socket itself on but no chance I'd be able to get a ratchet or a driver on top of that. Ring spanners fit but given the amount of "oomph" I have to apply already I'm really worried about rounding things off.
I've got a new socket set on order, which are hopefully not quite as deep as the cheapie ones I have (to be fair, my current 14mm one has very much seen better days anyway!) but I still worry there may not be enough room.
Are these b***ers usally stuck solid? I've obviously applied lots of penetrating oil already and wirebrushed what I could get to.
Also, I realise this is jumping the gun and probably cursing attempts at getting to it in the first place, but can anyone tell me what size the pinion nut is? I suspect rather big and I want to make sure I have the correct socket for it.
Thanks muchly! 
_________________
1992 L300 Exceed "Selma" |
|
| Back to top |
|
 |
Google
Sponsor

|
| Posted: Wed Nov 11, 2020 10:34 Post subject: Google Ads keep this community free to join! |
|
|
|
|
| Back to top |
|
|
Lewis
Site Admin

Joined: 25 May 2006
Posts: 16299
Location: Huddersfield
|
| Posted: Wed Nov 11, 2020 12:34 Post subject: |
|
|
They don't take much movement to get loose.
A long handled six sided ring spanner, to reduce chance of rounding off, used very gently, but consistently, will apply enough pressure to get them to move.
If you don't have a long spanner then use an extra one in the end of the first, to give more length.

This post I did for the L400 pinion seal replacement may be useful to you:-
http://www.MDOCUK.co.uk/forums/viewtopic.php?p=378384
_________________
Copyright is retained for all my photos. Please don't copy them without asking permission
Do not blindly go where the path may lead you. Go where there is no path and leave a trail that others may follow!
ルイス
Last edited by Lewis on Wed Nov 11, 2020 13:23; edited 1 time in total |
|
| Back to top |
|
|
Deker
Joined: 08 Mar 2008
Posts: 3833
Location: Borehamwood
|
| Posted: Wed Nov 11, 2020 22:04 Post subject: |
|
|
jejoenje.
Why are you concerned about "Snapping" the bolts, have you broken any 
As Lewis sez, buy a 6 point (tho his pic shows a 12 point  ) long combination spanner. ) long combination spanner.
Get a recognised quality make, you'll pay for it - You get what you pay for. If possible get Black, not chrome.
Tip = Lock the transmission, 1st gear (manual) or Park (auto).
Under the car - First always undo the nut, then -
when the bolt rotates, apply spanner/s, and rotate the easiest part of access to the fastener/s
Repeat = Do NOT try to undo the bolt, always the nut first.
Generally, nuts are softer than the bolts.
Bolts for prop shafts are made from a tough grade material, and often - if not always, have a fine thread.
Tip 2 = When under the car, that top faster is difficult to reach. DON'T struggle.
Move the car about a 1/4 wheel revolution, that will make that fastener easy to get to
HTH
Mr D |
|
| Back to top |
|
|
Deker
Joined: 08 Mar 2008
Posts: 3833
Location: Borehamwood
|
| Posted: Wed Nov 11, 2020 22:25 Post subject: |
|
|
More on my last post.
Recently I helped a new member (alfagunner (Steve)) to replace the front prop. seal on the transfer box.
Due to my age related probs. I could not get under the car (L400). I explained to Steve how to undo the nuts & bolts,
which he did okay
When it came to "Hooking out" the seal, he could not manage that, even tho I have the tools to do that job.
Well now, or not "so well  " I had to get under and hook out the seal. (Getting under vehicles now makes me feel giddy and sick " I had to get under and hook out the seal. (Getting under vehicles now makes me feel giddy and sick  ) )
Done it many times in the past, I know it takes a great deal of force to "Hook out" the seal, which I did.
The best/right tool is a "Heel Bar". Sometimes a "Pry Bar" will work, if you are lucky a strong screwdriver may work.
Do take care not to score the inside diameter of the part the seal is being extracted from.
HTH
Mr D |
|
| Back to top |
|
|
Lewis
Site Admin
Joined: 25 May 2006
Posts: 16299
Location: Huddersfield
|
| Posted: Wed Nov 11, 2020 23:46 Post subject: |
|
|
Note the picture is just a picture, from my library, not the spanners I used.
And unlike what Derek states do not lock the transmission.
As stated in the post I gave the link to, put it in Neutral, so you can turn the propshaft to have the nut/bolt you are working on to the bottom.
That is far easier than fidling about on top of the propshaft.
_________________
Copyright is retained for all my photos. Please don't copy them without asking permission
Do not blindly go where the path may lead you. Go where there is no path and leave a trail that others may follow!
ルイス |
|
| Back to top |
|
|
jejoenje
Joined: 20 Aug 2016
Posts: 785
Location: Alloa, Scotland
|
| Posted: Thu Nov 12, 2020 11:42 Post subject: |
|
|
Thank you both.
Lewis - already seen and read your post a few times. Thank you very much for resurrecting the pictures! 
| Deker wrote: |
Why are you concerned about "Snapping" the bolts, have you broken any
|
No. Not these ones. Yet.  That's why I was asking for ideas. Past experience shows I'm quite good at the That's why I was asking for ideas. Past experience shows I'm quite good at the
breaking/sharing bolts thing.
I'd already been on the double spanner trick - without much luck initially. I had to make do with 12-point ones.
Totally take your point re. 6-point ones. May be I should bite the bullet and shell out on some. They're hard to
find though! Can anyone recommend a specific make, and a supplier please?
The good news is, I managed to get at least 3 out of 4 moving by now. A combination of more penetrating oil,
more judicious "heaving" on two spanners, and careful application of heat, broke them loose. Just the one to
go, which is currently soaking in more penetrating oil.
Deker your suggestion of loosening the nut side first is actually a really good one - this makes a lot of sense
to me now that I think about it. Of course, sods law is that the nuts are the ones on the least accessible side
(towards the diff) meaning no chance whatsoever of getting a socket on there!
Incidentally, any thoughts on how to properly re-torque the flange bolts given I can't get a torque wrench and
socket on there
Also, in terms of "undoing" the pinion nut, unless it's going to far easier to remove than I expect, how to
accurately count the number of "turns" when removing
Again, if anyone can tell me the size of the socket I need for the pinion nut that would be amazing.
I know the L400 one is 30mm, but given the size difference of the diff in the L300, I wouldn't be surprised
if the nut is a different size?
_________________
1992 L300 Exceed "Selma" |
|
| Back to top |
|
|
Deker
Joined: 08 Mar 2008
Posts: 3833
Location: Borehamwood
|
| Posted: Thu Nov 12, 2020 19:59 Post subject: |
|
|
| Lewis wrote: |
| Note the picture is just a picture, from my library, not the spanners I used. |
I was jesting Lewis
| Lewis wrote: |
And unlike what Derek states do not lock the transmission.
As stated in the post I gave the link to, put it in Neutral, so you can turn the propshaft to have the nut/bolt you are working on to the bottom.
That is far easier than fidling about on top of the propshaft. |
To be fair Lewis, either method is what suits the person best. And, it is just my opinion.
Of course the prop shaft has to be rotated to bring the "top" fastener down.
From past experience, I found my method suited me.
It allowed me to apply all force, using two hands for releasing one part of the fastener, in a controlled way, without need to hold two spanners - one against t'other.
Having said that - I am of "Light Build" lack power of heavier folks  How did I manage when I worked on Caterpillar Tractors How did I manage when I worked on Caterpillar Tractors
| jejoenje wrote: |
Thank you both.
I'd already been on the double spanner trick - without much luck initially. I had to make do with 12-point ones.
Totally take your point re. 6-point ones. May be I should bite the bullet and shell out on some. They're hard to
find though! Can anyone recommend a specific make, and a supplier please?
Incidentally, any thoughts on how to properly re-torque the flange bolts given I can't get a torque wrench and
socket on there
Also, in terms of "undoing" the pinion nut, unless it's going to far easier to remove than I expect, how to
accurately count the number of "turns" when removing |
Spanners: Mac Tools = silly money. Snap On = Even more silly money: Teng tools are good: Kamasa have a Professional range.
Tightening the Flange fasteners, just do them up quite tight (You don't have to be Supermans Apprentice) may pay to re-check after a few miles.
No need to count turns on the Flange nut, it pulls against the Inner part of the bearing,
which has shims/spacers twixt it and the opposing internal parts. Therefore does not crush the bearing.
HTH
Mr D |
|
| Back to top |
|
|
jejoenje
Joined: 20 Aug 2016
Posts: 785
Location: Alloa, Scotland
|
| Posted: Thu Nov 12, 2020 20:50 Post subject: |
|
|
Mission accomplished! 
Managed to get all the flange bolts off, pull of the flange, take of pinion nut, lever out seal, put new one in,
and reverse - without much drama.
I was surprised that the flange fasteners were by far the most taxing part of all of this. They all moved,
eventually, but blimey they were pretty seized in there. I simply lifted the back end slightly off the ground to turn the
propshaft as necessary (in neutral of course), and then had her back on the "ground" (on low ramps with the front
*very* securely wedged) while doing the rest - saves having to counterhold the flange when taking the nut off.
I was really surprised to be able to get the pinion nut off with a short breaker bar (the nut is 30mm after all, btw).
No impact gun necessary. So was able to count turns and retighten back up to the same (ish) tension.
You were dead right Deker re the amount of violence needed to get the seal out though - quite surprising! 
Managed with a large screwdriver, with the end wrapped in a load of electrical tape to avoid scoring anything.
If it hadn't been for those stubborn flange fasteners and having to heave at them whilst
crawling around on my back with not much room, this would really have been an easy job. Ah, for a two-post lift...
Thanks for the advice all.
_________________
1992 L300 Exceed "Selma" |
|
| Back to top |
|
|
jejoenje
Joined: 20 Aug 2016
Posts: 785
Location: Alloa, Scotland
|
| Posted: Thu Nov 12, 2020 20:55 Post subject: |
|
|
Obviously that should have read, "take pinion nut off, pull off flange"... the other way around would be tricky indeed...
_________________
1992 L300 Exceed "Selma" |
|
| Back to top |
|
|
andyman
Joined: 08 Dec 2012
Posts: 5602
Location: Penrith
|
| Posted: Thu Nov 12, 2020 23:48 Post subject: |
|
|
I reckon, even with a barn to do mechanicking in, my work-rate in current autumnal conditions would be four coffees plus one bacon butty per flange nut and bolt. I'd better go to the supermarket and get some supplies in, I still have lower ball joints, rack bellows and track-rod ends to replace before impending MoT! Well done, BTW!)
_________________
Andy C L300 Super Exceed - over 100 smiles per gallon! |
|
| Back to top |
|
|
jejoenje
Joined: 20 Aug 2016
Posts: 785
Location: Alloa, Scotland
|
| Posted: Fri Nov 13, 2020 12:04 Post subject: |
|
|
Thanks Andy, and good luck with all of that. The lower ball joints is a particularly fun job... I should have some photos somewhere from when I did them, if that would help...
_________________
1992 L300 Exceed "Selma" |
|
| Back to top |
|
|
andyman
Joined: 08 Dec 2012
Posts: 5602
Location: Penrith
|
| Posted: Fri Nov 13, 2020 21:29 Post subject: |
|
|
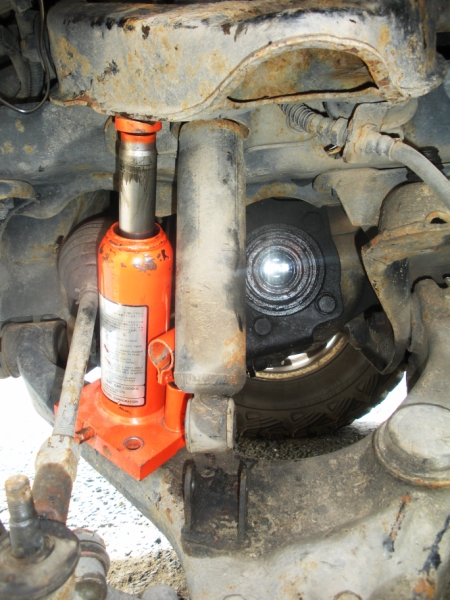
Thanks for the offer, Jeroen, I'll see how I get on, when I get around to it. I seem to remember someone saying to get the bottle jack between the outer upper wishbone and lower wishbone pivot, so as not to be fighting against the pressure of the torsion bar, does that seem right?
_________________
Andy C L300 Super Exceed - over 100 smiles per gallon! |
|
| Back to top |
|
|
Lewis
Site Admin
Joined: 25 May 2006
Posts: 16299
Location: Huddersfield
|
| Posted: Sat Nov 14, 2020 11:25 Post subject: |
|
|
As per:-
_________________
Copyright is retained for all my photos. Please don't copy them without asking permission
Do not blindly go where the path may lead you. Go where there is no path and leave a trail that others may follow!
ルイス |
|
| Back to top |
|
|
jejoenje
Joined: 20 Aug 2016
Posts: 785
Location: Alloa, Scotland
|
| Posted: Sat Nov 14, 2020 11:42 Post subject: |
|
|
Hi Andy
Somewhat ironically I don't actually quite remember exactly how I did it - will have a look through my photos and upload a selection.
I have a vague recollection that I may have actually had the torsion bar disconnected at its rear end. I definitely removed the
whole hub/knuckle assembly as I did both upper and lower joints at the time. I also replaced a seal in the inside of the knuckle.
I do remember, for some reason, finding refitting a whole lot more of a fight than dismantling. This may be because I chose to fit both
joints to the knuckle, and then re-fit the whole assembly in a oner, rather than attempt to squeeze one or the other with the rest of the
assembly already in place.
Kind of kicking myself now that I never wrote up notes, it's amazing how poor my memory is - it was only in 2017!
Anyway, this is a bit off-topic, so when I find the photos I'll upload them in a separate thread.
J
_________________
1992 L300 Exceed "Selma" |
|
| Back to top |
|
|
andyman
Joined: 08 Dec 2012
Posts: 5602
Location: Penrith
|
| Posted: Sat Nov 14, 2020 19:00 Post subject: |
|
|
Thanks both: I had a feeling it was Lewis who had previously posted the bottle jack method, (probably a safe bet anyway!)
_________________
Andy C L300 Super Exceed - over 100 smiles per gallon! |
|
| Back to top |
|
|
|
|
|
You cannot post new topics in this forum
You cannot reply to topics in this forum
You cannot edit your posts in this forum
You cannot delete your posts in this forum
You cannot vote in polls in this forum
|
|

