
|
Mitsubishi Delica Owners Club UK
Mitsubishi Delica L300, L400 and D:5 Owners Club
|
| View previous topic :: View next topic |
| Author |
Message |
AWG81
Joined: 26 Jul 2017
Posts: 115
Location: Seascale
|
 Posted: Sun Mar 21, 2021 17:02 Post subject: Front and rear bumper removal? Posted: Sun Mar 21, 2021 17:02 Post subject: Front and rear bumper removal? |
 |
|
Hi all,
I'm tidying up a few bumps and scrapes on my L400. I've got the bullbar off but I'm wondering if anyone any insights into how to take both the bumpers off? Are there any special hidden screws or is just trim clips? I thought I'd better check before I start ripping things off...
Thanks!
Andrew |
|
| Back to top |
|
 |
Google
Sponsor

|
| Posted: Sun Mar 21, 2021 17:02 Post subject: Google Ads keep this community free to join! |
|
|
|
|
| Back to top |
|
|
Lewis
Site Admin

Joined: 25 May 2006
Posts: 16296
Location: Huddersfield
|
| Posted: Mon Mar 22, 2021 13:54 Post subject: |
|
|
This post, which I did to show how to remove the rear bumper and fit inbuilt foglamps will help:- http://www.MDOCUK.co.uk/forums/viewtopic.php?t=14540
As for the Front you need to be more careful.
Remove the sidelights and headlamp clusters. Note that once the sidelights are out you will be able to see the two bolts holding the headlamps in place, plus there is a plastic panel pin below the clusters, hidden behind the upper panel.
There are plastic screw in type rivets holding the front upper panel in place (the one below the bonnet). Where it joins to the wing insert a thin smooth item, like a spoon handle, then just gently lever it to pull the plastic panel pin out of the hole in the metal wing.
With the lower panel be aware that there are two long bolts holding it to the bumper that bolt upwards from underneath, which bolt that to the chassis cross member.
The really tricky item is separating the plastic bumper from the metal wing. There are two bolts holding the panel to the wings. A metal spring clip is fitted over each of two holes tin the edge of the panel. The bolt is access from behind.
Now there are two ways to get to that depending on how many joints you have in your lower arm (   ). ).
With the sidelights out you can see where the two bolts connect the panel to the wing. If you can get your hand down the back of the gap, with a ring spanner your doing okay. The other, easier way is to remove the wheel arch liner.
Before trying to remove the bolt ensure the threads are rust free and well sprayed with WD40 or some other penetrating oil. If you have a small clamp position it to clamp the clip and metal edge of the wing together. You need to stop the clip from moving, otherwise when you turn the bolts the clip will spin round and rip the plastic part of the panel off. NB: Remember to tighten slightly to break the rust gripping it, then undo it. I suggest you only use a ring spanner to do it, not a ratchet, until loose, as you will feel if the clip is turning.
If you do break the panel mounting point holes then all is not lost, as they can be plastic welded, though that is more time and effort.
This diagram is the Top panel:-
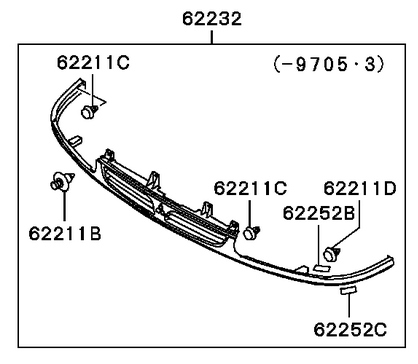
This diagram will show you where the various mounting point and bolt holes are for the lower panel. I've made it a url link, as it is a bit to large to display on here:-
https://u.cubeupload.com/Lewis/L400frontpanel.png
This shows the wing to front panel mounting points - the lower two holes. The top two are for the sidelight mounting pins.
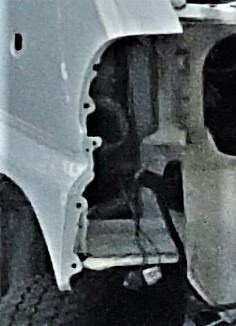
Wheel arch liner:
NB: There are two bolts through threaded spring clips at the top of the arch. Try not to damage any of the large plastic rivnuts holding the front airdams and arch liner in place, as they are not easy or cheap to replace.
HTH
_________________
Copyright is retained for all my photos. Please don't copy them without asking permission
Do not blindly go where the path may lead you. Go where there is no path and leave a trail that others may follow!
ルイス |
|
| Back to top |
|
|
AWG81
Joined: 26 Jul 2017
Posts: 115
Location: Seascale
|
| Posted: Mon Mar 22, 2021 19:54 Post subject: |
|
|
| Fantastic, thanks Lewis, this is super helpful. |
|
| Back to top |
|
|
AWG81
Joined: 26 Jul 2017
Posts: 115
Location: Seascale
|
| Posted: Wed Mar 24, 2021 14:59 Post subject: |
|
|
Hi again Lewis, not sure if I should start a new thread for this but it's sort of related - do you know to remove the exterior tailgate trim? The bit has Delica on it. Can I do this just by popping off the trim clips or do I need to remove the interior plastic trim too?
Thanks for this, lots of plastic bits I'm trying to remove without snapping the brittle 25 year old plastic. |
|
| Back to top |
|
|
Lewis
Site Admin
Joined: 25 May 2006
Posts: 16296
Location: Huddersfield
|
| Posted: Wed Mar 24, 2021 17:12 Post subject: |
|
|
You mean the one over the latch and number plate lamps.
That is an easy job.
First open the tailgate and lift up the rubber cover over the bolt holding the strap in place and remove that.
You then require a panel lever. If you dont have one a thin spoon handle will do, or some sturdy plastic.
On each corner and the centre of the top and bottom edge of the panel there is a twin part plastic retaining clip. its in the form of a long thin round pin with a thicker tip, pushed into a retainer. I suggest you start on the top passenger side corner, if your doing it roadside. Between those, around all the sides are normal panel retaining clips. slide the lever in between the panel and the bodywork, then move the lever sideways to get as close as possible to the clips, before levering the panel outwards
Take care and do not force things, otherwise you will snap the clips, which get brittle with age. Just have a cuppa then start again. by starting with the corner you will be able to see the other clips easier.
All the clips are easy to get hold of, apart from the two part ones, which are a dealer only item, costing about £6 each.
There are panel clip kits on eBay, which have several types of clips in them, along with some very useful panel levers. Its a case of knowing which clips are Delica and not something else, though many are interchangable.
Once you have the panel off you will be able to see the two bolts holding the trim in place.
Refitting it is easier if you have somebody hold the tailgate down, whilst you sit under it and then first fit the lower corners and centre pins, followed by the top edge. After that its easy to just give the other clips a thump to push them in.
If you break the two part clips let me know and I will put the part number up.
HTH
_________________
Copyright is retained for all my photos. Please don't copy them without asking permission
Do not blindly go where the path may lead you. Go where there is no path and leave a trail that others may follow!
ルイス |
|
| Back to top |
|
|
AWG81
Joined: 26 Jul 2017
Posts: 115
Location: Seascale
|
| Posted: Wed Mar 24, 2021 22:27 Post subject: |
|
|
Yeah, that's the one. Absolutely brilliant, thank you. Lastly, is there a post anywhere on removing the wing mirrors? I thought I'd seen one but can't seem to find it...
I'll post photos of the van when I've finished sprucing it up. |
|
| Back to top |
|
|
Lewis
Site Admin
Joined: 25 May 2006
Posts: 16296
Location: Huddersfield
|
| Posted: Wed Mar 24, 2021 22:31 Post subject: |
|
|

Try this one:- http://www.MDOCUK.co.uk/forums/viewtopic.php?t=50425
HTH
_________________
Copyright is retained for all my photos. Please don't copy them without asking permission
Do not blindly go where the path may lead you. Go where there is no path and leave a trail that others may follow!
ルイス |
|
| Back to top |
|
|
|
|
|
You cannot post new topics in this forum
You cannot reply to topics in this forum
You cannot edit your posts in this forum
You cannot delete your posts in this forum
You cannot vote in polls in this forum
|
|

