
|
Mitsubishi Delica Owners Club UK
Mitsubishi Delica L300, L400 and D:5 Owners Club
|
| View previous topic :: View next topic |
| Author |
Message |
jejoenje
Joined: 20 Aug 2016
Posts: 785
Location: Alloa, Scotland
|
 Posted: Wed May 06, 2020 14:16 Post subject: Rusty front brake line - footwell joints Posted: Wed May 06, 2020 14:16 Post subject: Rusty front brake line - footwell joints |
 |
|
Hi all,
Hope you are all keeping relatively well in these bizarre times!
With the nice weather and easier "access" to the garage during teabreaks (ahem...  ) I've been hunting for (and finding lots of) rust. ) I've been hunting for (and finding lots of) rust.
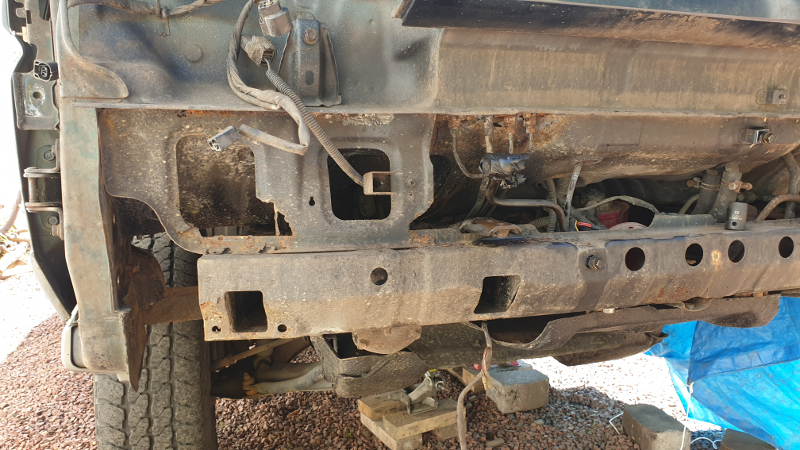
In the process of removing the front bumper cover to give it a lick of paint, I discovered some joys just behind it - lots of crusty bits starting to show.
Some uncomfortably close to the ends of the crossmembers. 
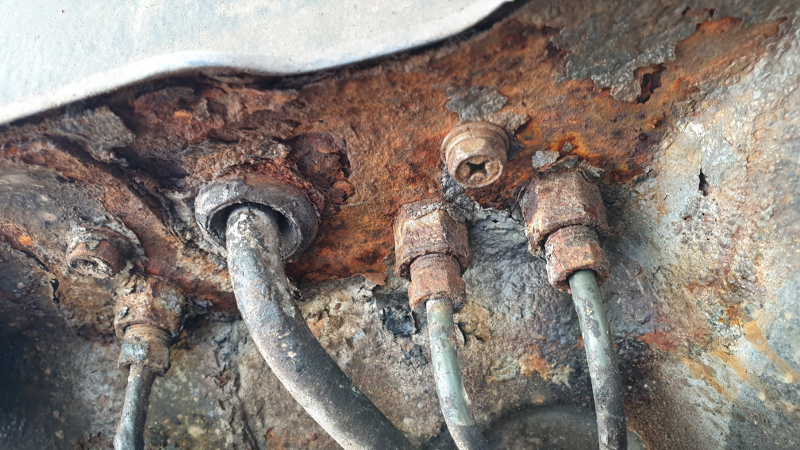
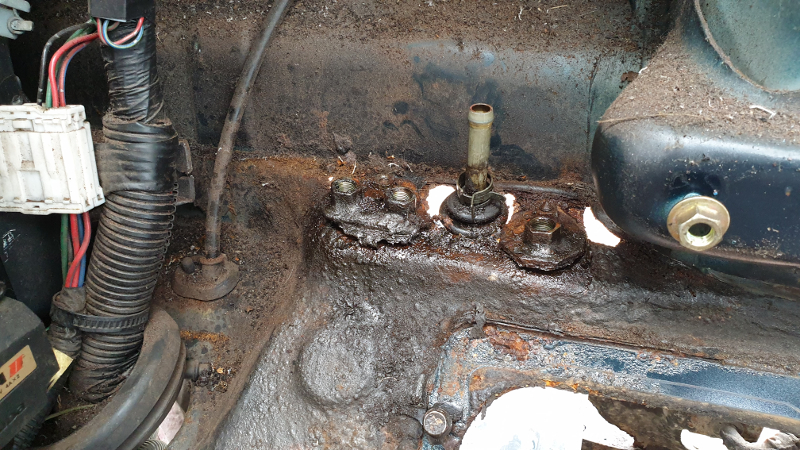
Anyway, a particularly crusty bit is right where the brake pipes exit the footwell - see pics below.
Given that I am not likely to be going anywhere in the van for the forseeable, and that I really should replace my master cylinder anyway, I am tempted
to address this as thoroughly as I can. However, before I start poking holes in this bit, especially around the brake line joints, would anyone be able to
enlighten me what this is supposed to look like (sans rust)? I am assuming that the two fasteners I can see hold in bits of panel with the brake line joints in?
Is it possible to cobble something together that does the same job, i.e. a specific "panel" joint for brake lines? (I've never actually dealt with brake lines
before so I don't know what sort of fittings are commonly available). Alternatively I could look for spares (I think it's part nos MB407004 for the
brake joint and clutch for the clutch line joint), but a quick Google suggests this will have to come
from Mitsubishi direct and I don't think any of my dealerships are open for this sort of stuff currently.
Any suggestions for tackling this? I very much suspect that I will have to somehow try to weld in a new bit of panel where those joints are - unless it looks far,
far worse than it is.
Thanks v much! 
_________________
1992 L300 Exceed "Selma" |
|
| Back to top |
|
 |
Google
Sponsor

|
| Posted: Wed May 06, 2020 14:16 Post subject: Google Ads keep this community free to join! |
|
|
|
|
| Back to top |
|
|
PinkPig
Lifetime member


Joined: 05 Aug 2004
Posts: 2720
Location: Southampton, UK
|
|
| Back to top |
|
|
andyman
Joined: 08 Dec 2012
Posts: 5602
Location: Penrith
|
| Posted: Wed May 06, 2020 15:02 Post subject: |
|
|
Hi Jeroen, having never had the front valance offmy van yet, I am finding it difficult to orientate myself to where those pipes emerge. Do they go through a single or double skin/box section? Unless you have pipe flaring tools, and can cut the pipes just below the union, and then flare the end and make up a new union, you might have to go back to the next joint, then get a pipe made up that goes from that joint to the next one above the rusty panel in your pic. Put holes in your new panel big enough for grommets, pass the new unions through the grommets, then fit the grommets, with pipes, through the holes. If the holes through the grommets are too big, fill with mastic. It is then unlikely that you will ever have to revisit those pipes and even if you do, it shouldn't be too big a job to dig out the grommets and replace as previously. PS having annoying, intermittent wet foot syndrome, and previous leaking m/c, I daren't think what that section of floor looks like on mine from underneath - it's probably being held together by the sound deadening!
_________________
Andy C L300 Super Exceed - over 100 smiles per gallon! |
|
| Back to top |
|
|
PinkPig
Lifetime member
Joined: 05 Aug 2004
Posts: 2720
Location: Southampton, UK
|
|
| Back to top |
|
|
jejoenje
Joined: 20 Aug 2016
Posts: 785
Location: Alloa, Scotland
|
| Posted: Wed May 06, 2020 16:59 Post subject: |
|
|
Thanks both!
Bahaha Sorry!  I can only assume, looking at your photos from 2011, it may be okay? Fingers crossed. I can only assume, looking at your photos from 2011, it may be okay? Fingers crossed.
The more I do this, the more I learn that it is just a matter of how much rust you want to find, not a question of whether there will be some.
I guess these vans are getting long enough in the tooth now to just have all the skeletons stored up. Having just spent ages rebuilding the front
end of the passenger wheel arch, I've now found loads of crusty stuff on the back end as well! Yay me!
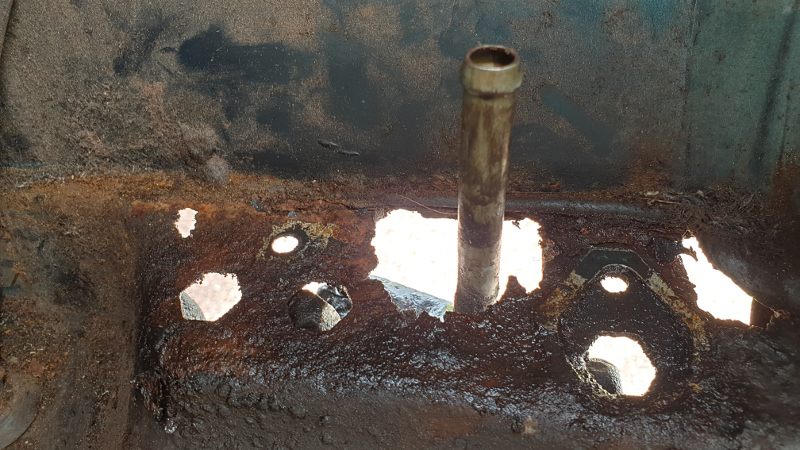
Thanks v much for the photos... super useful, and yep that's exactly the joint I was thinking about. I've just been poking holes, and as I expected,
even a very narrow punch went right through it, particularly around that larger pipe (I assume that's the clutch line, correct?).
| andyman wrote: |
Hi Jeroen, having never had the front valance offmy van yet, I am finding it difficult to orientate myself to where those pipes emerge. Do they go through a single or double skin/box section? Unless you have pipe flaring tools, and can cut the pipes just below the union, and then flare the end and make up a new union, you might have to go back to the next joint, then get a pipe made up that goes from that joint to the next one above the rusty panel in your pic. Put holes in your new panel big enough for grommets, pass the new unions through the grommets, then fit the grommets, with pipes, through the holes. If the holes through the grommets are too big, fill with mastic. It is then unlikely that you will ever have to revisit those pipes and even if you do, it shouldn't be too big a job to dig out the grommets and replace as previously. PS having annoying, intermittent wet foot syndrome, and previous leaking m/c, I daren't think what that section of floor looks like on mine from underneath - it's probably being held together by the sound deadening!
|
Hi Andy - they come in right in the drivers footwell, all the way in the darkest least accessible bit (of course). Just in front and to the right of where the steering column leaves the footwell, essentially below the brake booster etc.
I hadn't actually thought of just getting some rubber grommets - that would probably do the trick - thanks! I'm surprised there aren't any "panel join" type of brake line fittings.
Ironically, it's the panel around the brake line unions that is fooked, the unions themselves (and lines) surprisingly seem to be fine!
As for brake flaring tools - I'm considering just getting a basic flaring kit tbh. I suspect it may end up coming in handy. 
Right... I better go and order that master cylinder...  [i] [i]
_________________
1992 L300 Exceed "Selma" |
|
| Back to top |
|
|
PinkPig
Lifetime member
Joined: 05 Aug 2004
Posts: 2720
Location: Southampton, UK
|
|
| Back to top |
|
|
andyman
Joined: 08 Dec 2012
Posts: 5602
Location: Penrith
|
| Posted: Wed May 06, 2020 19:04 Post subject: |
|
|
Yes, my m/c leak ran down the steering column and gave me stiff and lumpy steering. Very disconcerting when you drive straight off down the road, and it doesn't want to turn, and then it doesn't want to straighten out!
_________________
Andy C L300 Super Exceed - over 100 smiles per gallon! |
|
| Back to top |
|
|
jejoenje
Joined: 20 Aug 2016
Posts: 785
Location: Alloa, Scotland
|
| Posted: Fri May 08, 2020 12:06 Post subject: |
|
|
So, having decided to replace, and ordered a replacement master cylinder, AND needing to address those brake pipes hidden in very dark corners of the footwell,
I've once again disassembled the entire dash, and even removed the steering column for easier access.
I realise that for just replacing the M/C, I don't need to do this, but can the whole brake/clutch pedal/booster/MC assembly be removed "in a oner"?
It looks like it does, but the manual - 35-29 seems to talk about removing pedals etc (clevis pins bla bla). Can this not just be unbolted, disconnecting the brake pipes/hoses etc?
Welding that area of footwell where the pipes come in will be almost impossible with all the pedals etc in place.
_________________
1992 L300 Exceed "Selma" |
|
| Back to top |
|
|
andyman
Joined: 08 Dec 2012
Posts: 5602
Location: Penrith
|
| Posted: Fri May 08, 2020 15:19 Post subject: |
|
|
Checked mine as a result of seeing your pics - fortunately mine seems to be okay in that area, but discovered my a/c fan is seized - no wonder it wasn't very effective, even after being regassed. Just thinking, if that bit of floor isn't structural, could it be replaced with either plastic or metal pop riveted/self-tappered/Tiger-Sealed into place?
_________________
Andy C L300 Super Exceed - over 100 smiles per gallon! |
|
| Back to top |
|
|
jejoenje
Joined: 20 Aug 2016
Posts: 785
Location: Alloa, Scotland
|
| Posted: Fri May 08, 2020 16:07 Post subject: |
|
|
| andyman wrote: |
| Checked mine as a result of seeing your pics - fortunately mine seems to be okay in that area, but discovered my a/c fan is seized - no wonder it wasn't very effective, even after being regassed. Just thinking, if that bit of floor isn't structural, could it be replaced with either plastic or metal pop riveted/self-tappered/Tiger-Sealed into place? |
Ha, great minds think alike - I was just musing over cutting the rot out, and fitting a bit of aluminium/stainless plate (with holes for the lines) using some fasteners of some sort and sealant. 
I may end up doing that, if the resulting hole sans rust is too awkward to weld. Which it may well be, given where it is...
Glad to hear your bits look okay (fnarr). Did you remove the bumper?
I've long not had an A/C, the gas must have left it long before I got her, so it never worked.
I've already removed the rear condenser etc, and am currently considering removing the compressor (took what was left of the belt off when I did the alt belts) and all associated pipework.
Considering how much I've already removed at the minute I think it might only be a minor job, really, and at the moment it's all just dead weight.
_________________
1992 L300 Exceed "Selma" |
|
| Back to top |
|
|
andyman
Joined: 08 Dec 2012
Posts: 5602
Location: Penrith
|
| Posted: Sat May 09, 2020 19:29 Post subject: |
|
|
No, I haven't removed my bumper, managed to shine a torch up into the corner and was pleasantly surprised, and it doesn't look like the brake fluid from the leak got onto that area from the inside. I will need to do some disassembly to work out what got bent when I rear ended and wrote off a Rav 4 3 years ago when the brake pedal went to the floor. If you look carefully, you can see the plastic bull bar cover doesn't quite fit properly. Must be strongly made! I had the A/C purged and regassed with R134a a few months before that, and it worked, if not particularly well. I don't remember hearing the fan when I switched it on, so that may indicate why it was relatively ineffective. I put it down to the relative ineffectiveness of R134a compared to the old R12 ozone-eating stuff.
_________________
Andy C L300 Super Exceed - over 100 smiles per gallon! |
|
| Back to top |
|
|
jejoenje
Joined: 20 Aug 2016
Posts: 785
Location: Alloa, Scotland
|
| Posted: Sat May 09, 2020 20:23 Post subject: |
|
|
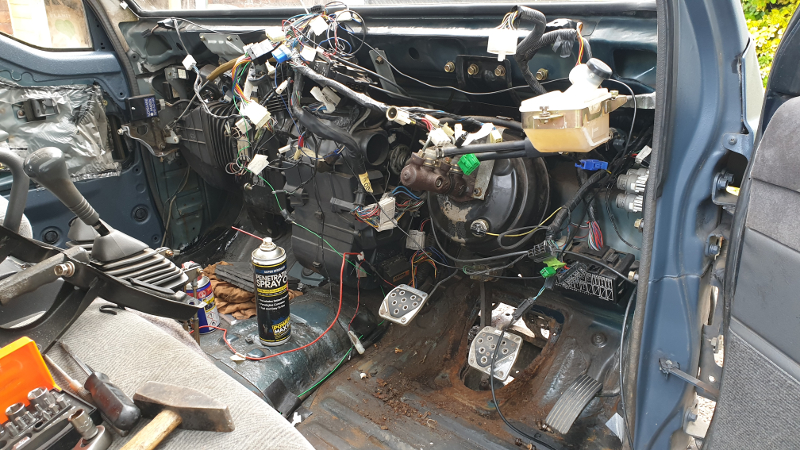
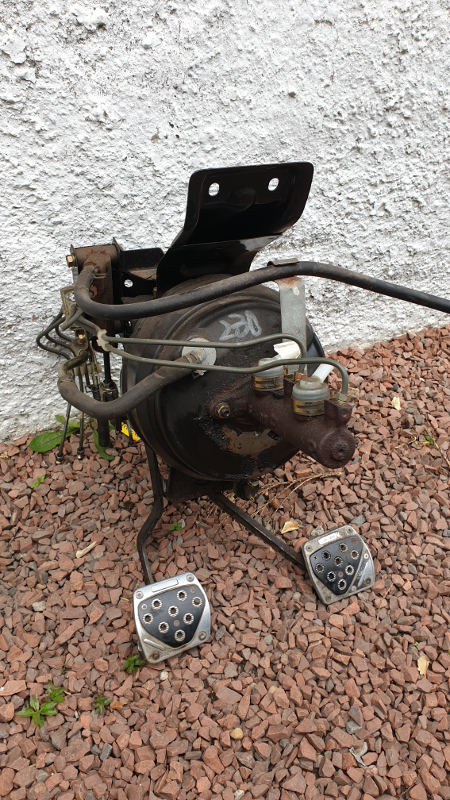
Sooooo... to answer my own question (can the booster/pedal/MC assembly be removed in a oner), PREPARE FOR NAKEDNESS:
Now you see it:
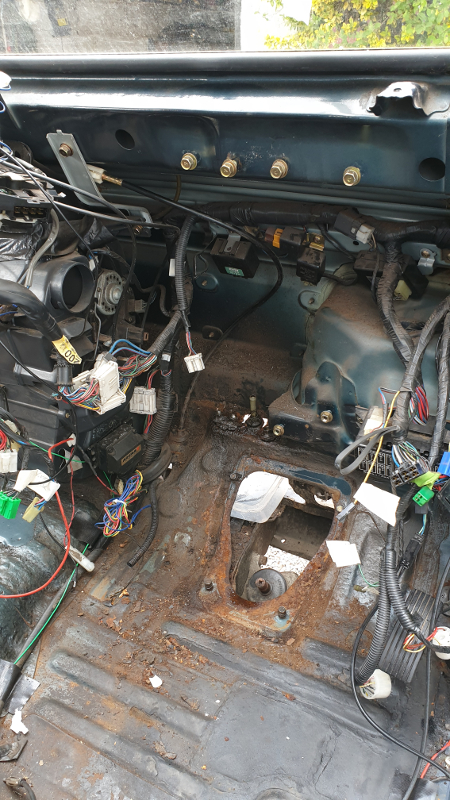
Now you don't:
... so in short, yes it can, quite easily, as I thought - only two bolts and two nuts, holding the whole gubbins in, apart from obvs the brake pipes/hoses and some electrical connections.
Is it just me or does it look a bit like a strange post-apocalyptic spider thing?
In the resulting state of undress it is now easy to see where my rust issues are...
Looks like I'll be doing quite a lot of rust treating the steering column plate, too

The good news is that the two brackets that make up the brake union joints appear to be in reasonable nick.
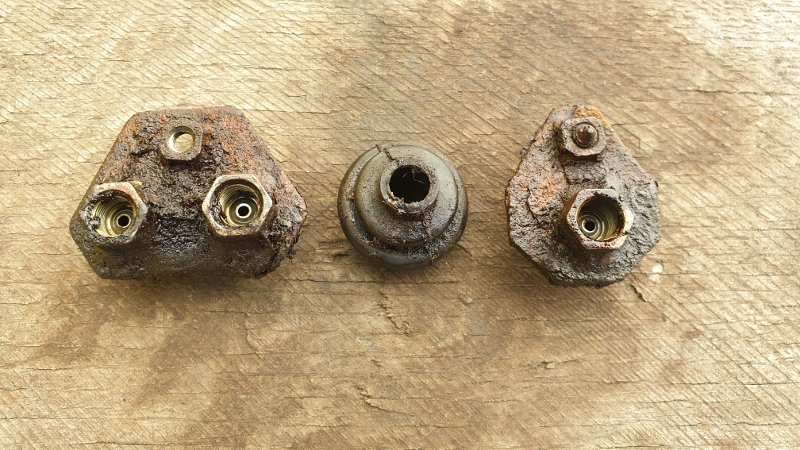
I've yet to clean them up but I think I can re-use these, which is great, because I can just build the repair plate "around" it.
Also haven't yet decided what to do yet in terms of the patch plate - welding or bonding. I'm currrenly leaning towards bonding (possibly a bit of aluminium plate?), but any further thoughts appreciated.
I'm now actually seriously considering taking pretty much everything that is left in the dash area - essentially just the blower/heater assembly and now defunct AC bits - out as well, and actually have a completely stripped
dash are to PROPERLY clean, rust treat, and paint. And hopefully never have to go anywhere in there ever again.
_________________
1992 L300 Exceed "Selma" |
|
| Back to top |
|
|
andyman
Joined: 08 Dec 2012
Posts: 5602
Location: Penrith
|
| Posted: Sun May 10, 2020 13:40 Post subject: |
|
|
You're a brave man! I'm glad you got the unions apart okay; does that mean you won't need any brake pipes? Or are you going to replace them anyway? You couldn't have a better time to do a thorough job on it, I usually put off big dismantling and repair jobs on the basis that I might want to use the bus. No excuse now (except it's a bit cold and draughty for lying on a stone slab barn floor right now)
_________________
Andy C L300 Super Exceed - over 100 smiles per gallon! |
|
| Back to top |
|
|
PinkPig
Lifetime member
Joined: 05 Aug 2004
Posts: 2720
Location: Southampton, UK
|
|
| Back to top |
|
|
jejoenje
Joined: 20 Aug 2016
Posts: 785
Location: Alloa, Scotland
|
| Posted: Sun May 10, 2020 20:03 Post subject: |
|
|
| andyman wrote: |
| You're a brave man! I'm glad you got the unions apart okay; does that mean you won't need any brake pipes? Or are you going to replace them anyway? You couldn't have a better time to do a thorough job on it, I usually put off big dismantling and repair jobs on the basis that I might want to use the bus. No excuse now (except it's a bit cold and draughty for lying on a stone slab barn floor right now) |
Nope looks like I'll be able to get away with just reusing all pipes and joints - provided I can cobble together a suitable patch plate that fits those joints in the photo
Yes I know what you mean - it was chilly out today! Although I would probably gladly swap a bunch of poor weather for a roof over the van, never mind an actual barn. Sadly our garage is just not big enough, and having somewhere under cover would make things so, so much easier. Even if cold! My dream is a workshop big enough that I can just leave stuff out in - having to move all of the work in and out every day does make everything take that bit longer.
| PinkPig wrote: |
Good work!
I notice you driver floor pan has been played the same as mine. Must be the lowest point in the pond?
I would go for bonding anything non-structural as weld seems to make new rust, or is that my imagination?
|
Ta!
I actually did a bit of welding on the drivers footwell just over a year ago. Sadly it's already starting to show at least surface rust, so you might be right
Planning to clean it all up and re-paint - probably using some 2K epoxy stuff. Several layers of it
I've now also got the heater unit out - planning to also remove the A/C unit next to it and fit a custom joint as per Mystery Machine's thread.
More to come.
_________________
1992 L300 Exceed "Selma" |
|
| Back to top |
|
|
PinkPig
Lifetime member
Joined: 05 Aug 2004
Posts: 2720
Location: Southampton, UK
|
|
| Back to top |
|
|
davep10000

Joined: 17 Sep 2009
Posts: 209
Location: Dumfries, SW Scotland
|
| Posted: Wed May 13, 2020 16:53 Post subject: |
|
|
Impressive work - just one observation is that its very common for the seals on the plastic m/cyl reservoir connections to fail.
This causes brake fluid to leak down the column and rust the floor plate.
This has happened on mine and I needed to buy new seals from Mitsi in Japan. (Not expensive)
Its often misdiagnosed as a faulty m/cyl.
Dave |
|
| Back to top |
|
|
|
|
|
You cannot post new topics in this forum
You cannot reply to topics in this forum
You cannot edit your posts in this forum
You cannot delete your posts in this forum
You cannot vote in polls in this forum
|
|

