
|
Mitsubishi Delica Owners Club UK
Mitsubishi Delica L300, L400 and D:5 Owners Club
|
| View previous topic :: View next topic |
| Author |
Message |
mouseflakes

Joined: 17 Jun 2012
Posts: 193
Location: Kendal
|
 Posted: Sun Mar 22, 2020 1:20 Post subject: Captain's seat wobble - new pics Posted: Sun Mar 22, 2020 1:20 Post subject: Captain's seat wobble - new pics |
 |
|
I've done this fix on my van. Followed the instructions here...
FAQ version
It was really helpful but photos are missing on that FAQ now, so I hope this is a useful update.
I did the seat nearest the door first. I found that unbolting the seat from the runners as described caused a bit of an issue. The 'locking' rod that runs up inside the base here is contained in a steel tube which passes into the base through a nylon bushing, When you unbolt the seat the spring here unavoidably pushes the tube out of the hole in the seat base. The end result is that you have to relocate the nylon bush and steel tube against the force of the spring when you put the seat back on the rails. Greasy and awkward. I realised the whole process can be done without removing the seat from the rails, so I did it this way on the second seat, and took some photos.
One thing I'll say, to reassure anyone thinking of doing this. I was concerned that any one of the many 'sprung' components (including the lap belt) might become detached and unsprung while doing this, leading to a difficult rebuild. In fact, all these bits are self-contained and taking the seat apart as described here doesn't risk the release of any springs (unless you choose to remove the seat from the runners, as in the original FAQ, when the spring described in the paragraph above is unavoidably released).
First, remove the plastic trim from front and back of the seat base. Remove the two screws and unclip top and bottom at either end. The parts and tough and quite flexible. They didn't feel like any were likely to snap, which was reassuring.


Next, remove the two recessed screws on the side panels. The one with the operating levers on it is a bit awkward. At this point I was nervous of snapping the plastic ends of the levers (seen a few seats on ebay with them missing). So, working from front to back, I took the small screw out of the 'rotate' control and took the plastic end off. The 'slide' control I removed by reaching under the side panel with a 10mm spanner and removing the metal part of the lever from the spindle there. The 'recline' lever I didn't fancy removing just in case I managed to unleash the heavy spring here. So, this panel just remains loose at this point. The simpler panel on the other side comes right off (just unthread the lap belt from the slot in the plastic panel and lift it away).

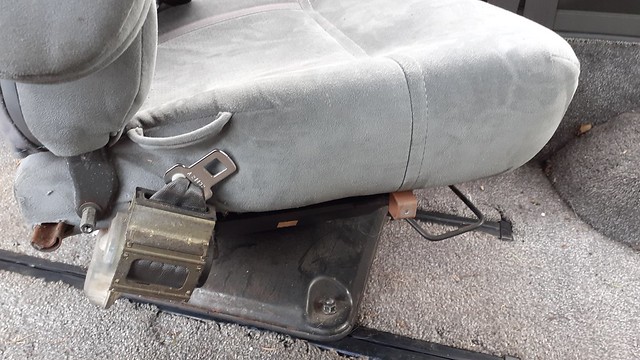 [ [
Back on the 'controls' side, reach under the loose side panel towards the rear and find the two (14mm?) bolts that hold the back of the seat on this side. Undo them, just being careful to support the back (it's okay really, just be aware that it's nearly detached by now).

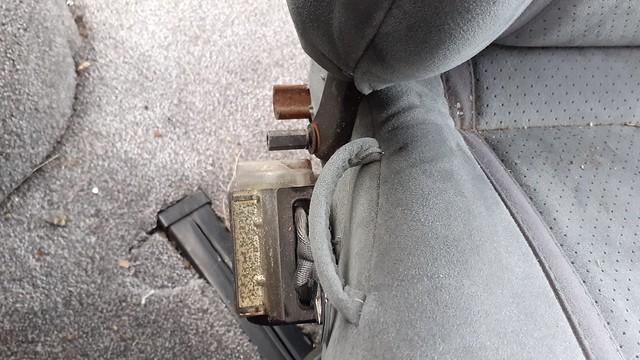
Look over to the other side of the seat now. See that the seat back is held by this extended bolt thingy here. 10mm - was easy to undo. Note this releases the seat back completely. It's not heavy, but just be aware that the side panel and 'recline' lever are still attached. Lift the back away while taking care of the panel and lever.
Here's the back removed.

And here's the base.

Now you can remove the two 'R' pin clips from the control spindles that are exposed once the control level panel and seat back has come off. On the 'slide' control I chose to remove the connecting lever that the R clip holds here. The end could have just been pushed off the spindle (I did that on the first seat) but it felt better to remove it rather than force it.
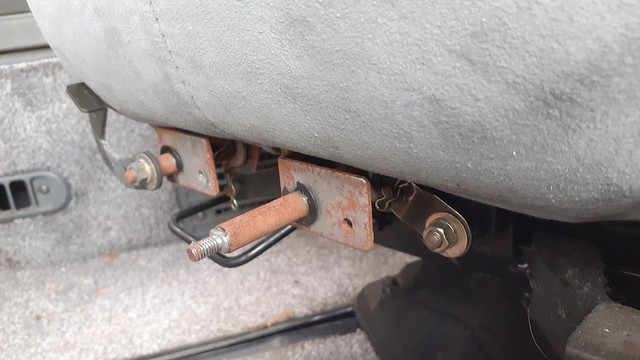
By now my back was aching, so it was nice to lie on my chest over the seat base and undo the four 12mm nuts that hold the seat base on. You can just see two of them here - the bright ones facing 'downwards' under the metal seat base - not the domed nuts that hold the pedestal to the runners. We don't need to touch those.
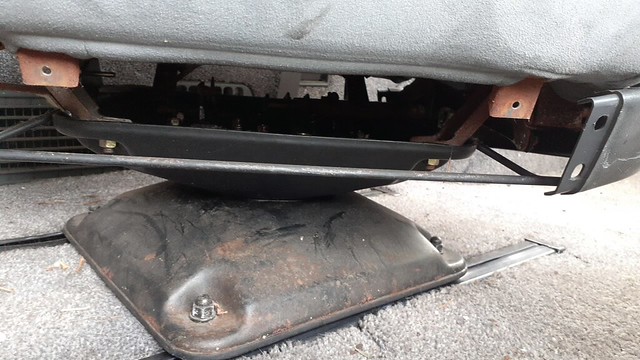
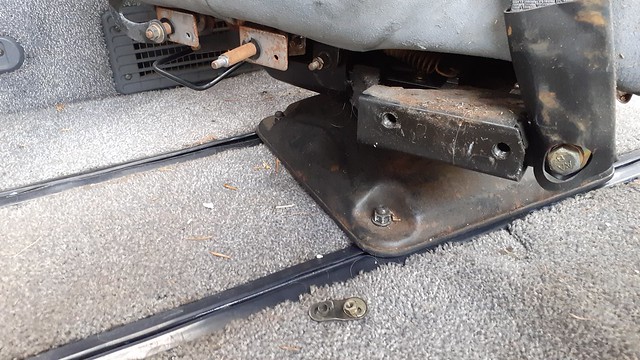
Lift the base away and you can see the base plate arrangement where all the wobble resides.
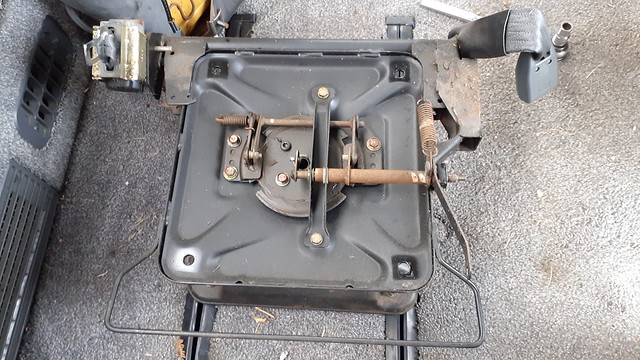
That central disc controls the 'rotate' function and locks the seat in the various positions. The plates on either side of it allow it to rotate, but constrain the amount of vertical movement. I guess that wear in the mechanism causes a gap to open between these control plates and the disc. So, as described in the original FAQ, loosen both the bolts on both these plates (one bolt is hidden by that rusty rod in the photo above).
Working one one plate at a time, remove one of the bolts completely. You'll see there's a washer that the bolt passes through underneath the plate. Add a second washer here, being careful not to dislodge the original. Loosely replace the bolt, making sure it passes through both washers now under the plate. Repeat on the second bolt on this plate. Note the plate is in two parts, one above and one below the disc. What you're doing here is moving the lower plate closer to the underside of the big disc to tighten up the vertical play.

Once you've done one plate, move to the plate on the opposite side of the disc and repeat. Tighten all the nuts when you're done.
You might want to experiment with washer thicknesses/numbers. You need a combination that stops the wobble but doesn't make the seat too tight to rotate. First seat I was lucky with but the second took a bit of trial and error with different washer thicknesses.
Reverse the steps to reassemble the seat. When replacing the middle 'slide' control lever, it's difficult to get the washers and nut back on the spindle once the seat back and side panel are in place, even though the side panel is still loose at this point. But you're nearly done, so stick with it and you'll soon have wobble-free seats.
_________________
1992 L300 Super Exceed |
|
| Back to top |
|
 |
Google
Sponsor

|
| Posted: Sun Mar 22, 2020 1:20 Post subject: Google Ads keep this community free to join! |
|
|
|
|
| Back to top |
|
|
andyman
Joined: 08 Dec 2012
Posts: 5602
Location: Penrith
|
| Posted: Sun Mar 22, 2020 1:53 Post subject: |
|
|
Nice one Tim. Very clear and detailed explanation. Both mine wobble (don't they all?) so I may now feel confident to tackle this in the long days of Covid- induced worklessness! I hope you and yours are keeping well.
_________________
Andy C L300 Super Exceed - over 100 smiles per gallon! |
|
| Back to top |
|
|
|
|
|
You cannot post new topics in this forum
You cannot reply to topics in this forum
You cannot edit your posts in this forum
You cannot delete your posts in this forum
You cannot vote in polls in this forum
|
|

