| View previous topic :: View next topic |
| Author |
Message |
Derek
Lifetime member


Joined: 13 Mar 2004
Posts: 453
Location: Beeston Regis
|
 Posted: Sat Sep 29, 2018 11:43 Post subject: Front Hub Nut Removal Posted: Sat Sep 29, 2018 11:43 Post subject: Front Hub Nut Removal |
 |
|
I need to replace a front disc and notice that the hub nut "should" need a special removal tool.
Has anyone done this job and, if so, how they removed the nut?
Cheers
_________________
1996 PE8W, 1994 PF8W*2, Gilera Fuoco, and a Smart Electric Drive. |
|
| Back to top |
|
 |
Google
Sponsor

|
| Posted: Sat Sep 29, 2018 11:43 Post subject: Google Ads keep this community free to join! |
|
|
|
|
| Back to top |
|
|
YOZA

Joined: 07 Mar 2005
Posts: 2423
Location: The centre of the universe
|
| Posted: Sat Sep 29, 2018 18:14 Post subject: |
|
|
No special tool required
Take off spring circlip from end of shaft
Take off thin spacer washer
Take off hub ring holder 6 x 12mm socket bolts
Un-screw hub ring by un-screwing x2 m5 bolts then slide off the perforated locking washer.
Then insert two bolts adjacent to each other in the hub ring and use these to un-screw the ring.
_________________
Artificial intelligence is no match for natural stupidity.... |
|
| Back to top |
|
|
Derek
Lifetime member
Joined: 13 Mar 2004
Posts: 453
Location: Beeston Regis
|
| Posted: Sat Sep 29, 2018 23:29 Post subject: |
|
|
Aha :D
I've not started pulling it apart yet but the workshop manual term for your "hub ring" is the "lock nut".
I can also now see where the 2xM5 bolts are and how one uses them to unscrew the hub ring.
Great stuff, many thanks 
_________________
1996 PE8W, 1994 PF8W*2, Gilera Fuoco, and a Smart Electric Drive. |
|
| Back to top |
|
|
Derek
Lifetime member
Joined: 13 Mar 2004
Posts: 453
Location: Beeston Regis
|
| Posted: Tue Oct 02, 2018 22:49 Post subject: |
|
|
Thanks guys.
Not done the job yet as I'm waiting for back plates from Mitsubishi.
The originals were falling apart with rust 
_________________
1996 PE8W, 1994 PF8W*2, Gilera Fuoco, and a Smart Electric Drive. |
|
| Back to top |
|
|
YOZA
Joined: 07 Mar 2005
Posts: 2423
Location: The centre of the universe
|
| Posted: Wed Oct 10, 2018 10:41 Post subject: |
|
|
Just changing my front discs / cvs / wheel bearings - taking the abs rings off was a nightmare also the bolts holding the disc to the hub would not undo from the front, the rear have nuts on that you cannot access without taking off the abs ring.
The two cross head screws holding the locking ring need to be impact driven off.
Then the disc still wont come off as though it was welded to the hub.
The bearings are taper so easy swap.
_________________
Artificial intelligence is no match for natural stupidity.... |
|
| Back to top |
|
|
Derek
Lifetime member
Joined: 13 Mar 2004
Posts: 453
Location: Beeston Regis
|
| Posted: Wed Oct 10, 2018 17:10 Post subject: |
|
|
Just started on mine.
Thankfully no aggro with the locking ring screws.
No ABS so I could get to the nuts on the back of the disc.
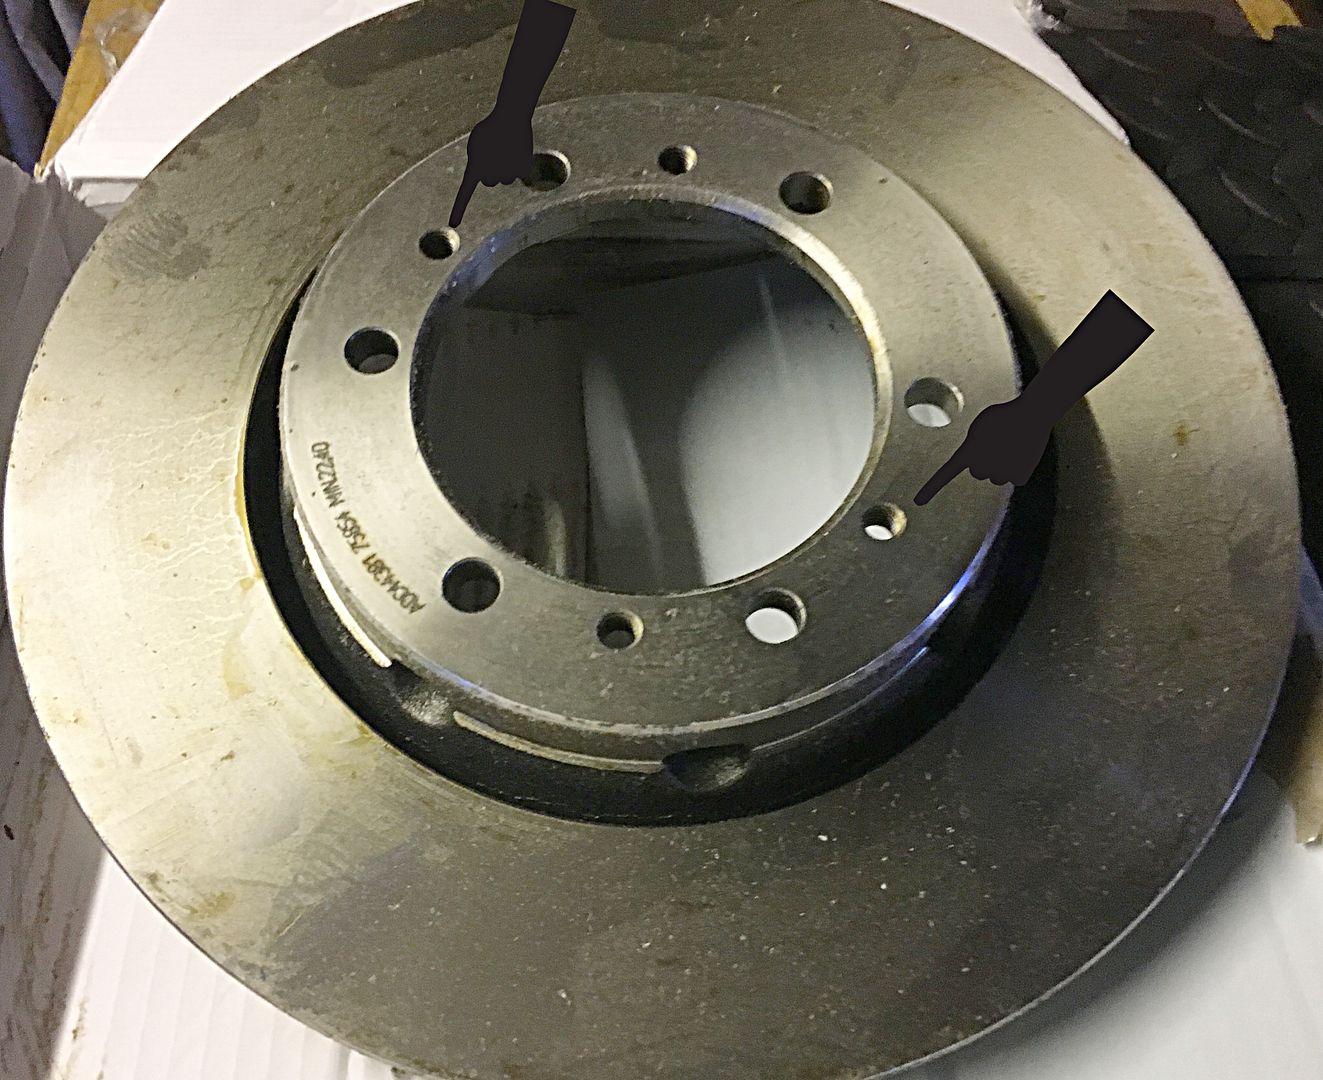
Looks like there's a couple of threaded holes through which one drive bolts to push the disc off the hub.
I've stopped short of that because the discs I got are wrong. (Not my fault)
Opened the box and thought, "Something's different :?".
Five hole mounting to the hub not six 
Local motor factor's are getting the correct ones in tomorrow.
_________________
1996 PE8W, 1994 PF8W*2, Gilera Fuoco, and a Smart Electric Drive. |
|
| Back to top |
|
|
Lewis
Site Admin

Joined: 25 May 2006
Posts: 16299
Location: Huddersfield
|
| Posted: Thu Oct 11, 2018 1:51 Post subject: |
|
|
| YOZA wrote: |
| Just changing my front discs / cvs / wheel bearings |
Don't forget to do the Upright Bearings whilst your at it. It would be a shame to have to take everything off again to do them.
HTH
_________________

Copyright is retained for all my photos. Please don't copy them without asking permission
Do not blindly go where the path may lead you. Go where there is no path and leave a trail that others may follow!
ルイス
Last edited by Lewis on Sun Apr 05, 2020 10:14; edited 1 time in total |
|
| Back to top |
|
|
YOZA
Joined: 07 Mar 2005
Posts: 2423
Location: The centre of the universe
|
| Posted: Thu Oct 11, 2018 8:33 Post subject: |
|
|
Is that the small needle bearing race that carries the drive shaft ?
tia
_________________
Artificial intelligence is no match for natural stupidity.... |
|
| Back to top |
|
|
Lewis
Site Admin
Joined: 25 May 2006
Posts: 16299
Location: Huddersfield
|
| Posted: Thu Oct 11, 2018 11:39 Post subject: |
|
|
Yes. As per the piccies and info on this post:- http://www.MDOCUK.co.uk/forums/viewtopic.php?t=46184
I didn't even know mine were stuffed until I took the Hub off the Knuckle.
_________________
Copyright is retained for all my photos. Please don't copy them without asking permission
Do not blindly go where the path may lead you. Go where there is no path and leave a trail that others may follow!
ルイス |
|
| Back to top |
|
|
Derek
Lifetime member
Joined: 13 Mar 2004
Posts: 453
Location: Beeston Regis
|
| Posted: Sat Oct 13, 2018 16:13 Post subject: |
|
|
What grease are you using for the wheel bearings?
The original stuff is a whole lot thicker than LM.
Cheers
_________________
1996 PE8W, 1994 PF8W*2, Gilera Fuoco, and a Smart Electric Drive. |
|
| Back to top |
|
|
YOZA
Joined: 07 Mar 2005
Posts: 2423
Location: The centre of the universe
|
| Posted: Sat Oct 13, 2018 21:31 Post subject: |
|
|
Comma advanced performance wheel bearing grease - NLGI 2
I was told to put a blob of grease in a cat/dog food bowl and warm it up until it melts then carefully place the bearings in the dish until the grease goes cool, thus completely coating the bearings inside and out. The overflow grease off the bearings can be used as usual inside the Hub.
Tightening the retainer ring was an eye opener I can't remember the Lbs ft of torque but it was on par with the crank pulley bolt, and then to undo it -10 minutes was odd, then slide on the lock ring and secure with 2X m6 bolts.
_________________
Artificial intelligence is no match for natural stupidity.... |
|
| Back to top |
|
|
Derek
Lifetime member
Joined: 13 Mar 2004
Posts: 453
Location: Beeston Regis
|
| Posted: Sat Oct 13, 2018 23:36 Post subject: |
|
|
Interesting :?
My Castrol LM grease appears a lot thinner than the original but has an NLGI rating of 2.
Ta
_________________
1996 PE8W, 1994 PF8W*2, Gilera Fuoco, and a Smart Electric Drive. |
|
| Back to top |
|
|
Lewis
Site Admin
Joined: 25 May 2006
Posts: 16299
Location: Huddersfield
|
| Posted: Sun Oct 14, 2018 10:23 Post subject: |
|
|
Personally I use the same Lithium grease that I use on the CV joint bearings.
_________________
Copyright is retained for all my photos. Please don't copy them without asking permission
Do not blindly go where the path may lead you. Go where there is no path and leave a trail that others may follow!
ルイス |
|
| Back to top |
|
|
Derek
Lifetime member
Joined: 13 Mar 2004
Posts: 453
Location: Beeston Regis
|
| Posted: Sun Oct 14, 2018 13:00 Post subject: |
|
|
Yeh, I've cleaned out the old grease and used the Castrol LM (Lithium)
_________________
1996 PE8W, 1994 PF8W*2, Gilera Fuoco, and a Smart Electric Drive. |
|
| Back to top |
|
|
YOZA
Joined: 07 Mar 2005
Posts: 2423
Location: The centre of the universe
|
| Posted: Tue Oct 16, 2018 20:19 Post subject: |
|
|
Don't forget these little blighters.
_________________
Artificial intelligence is no match for natural stupidity.... |
|
| Back to top |
|
|
YOZA
Joined: 07 Mar 2005
Posts: 2423
Location: The centre of the universe
|
| Posted: Sat Oct 27, 2018 9:18 Post subject: |
|
|
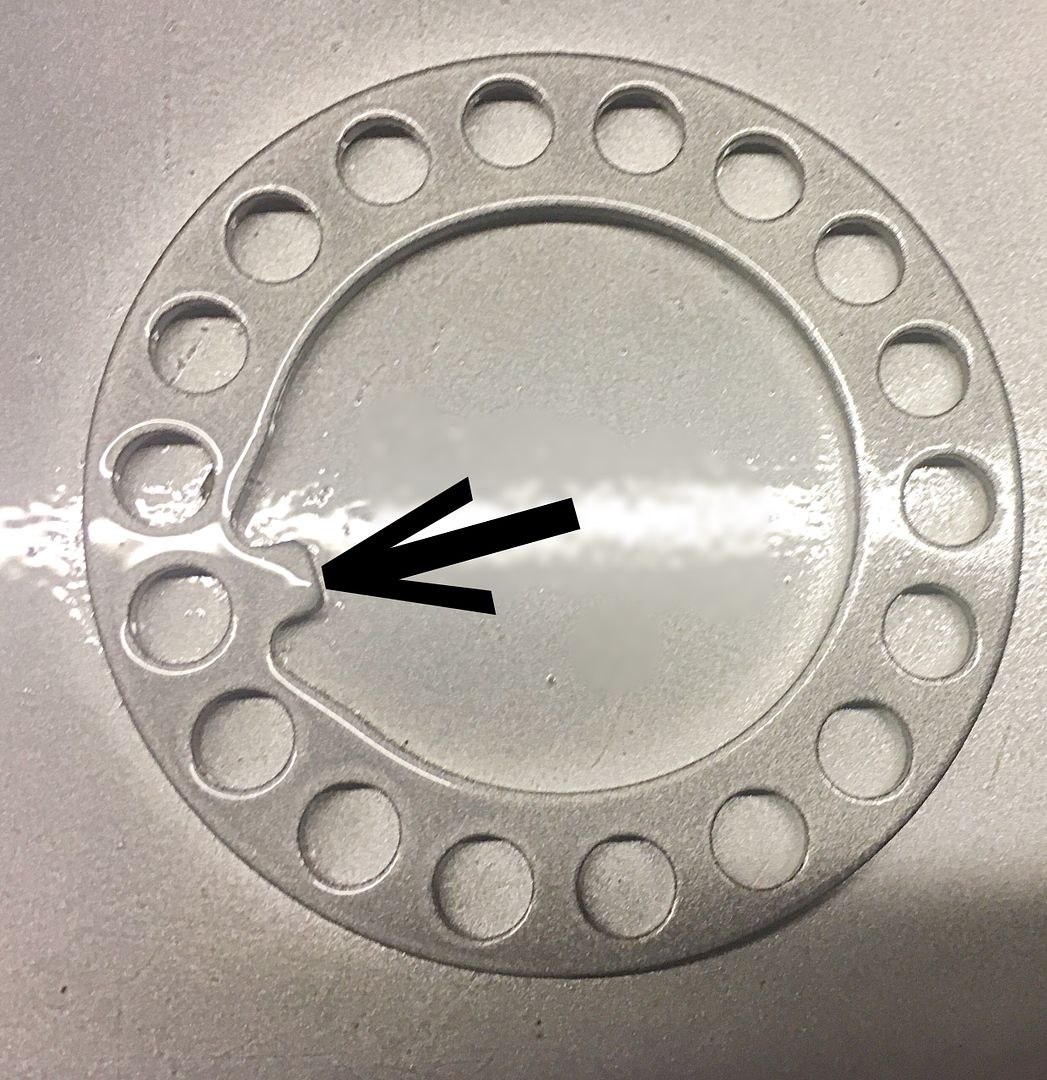
The locking ring looks like this, the tab arrowed locks the ring against the hub shaft, then you replace the two locking bolts into the matching holes in the ring and into the torqued hub nut.
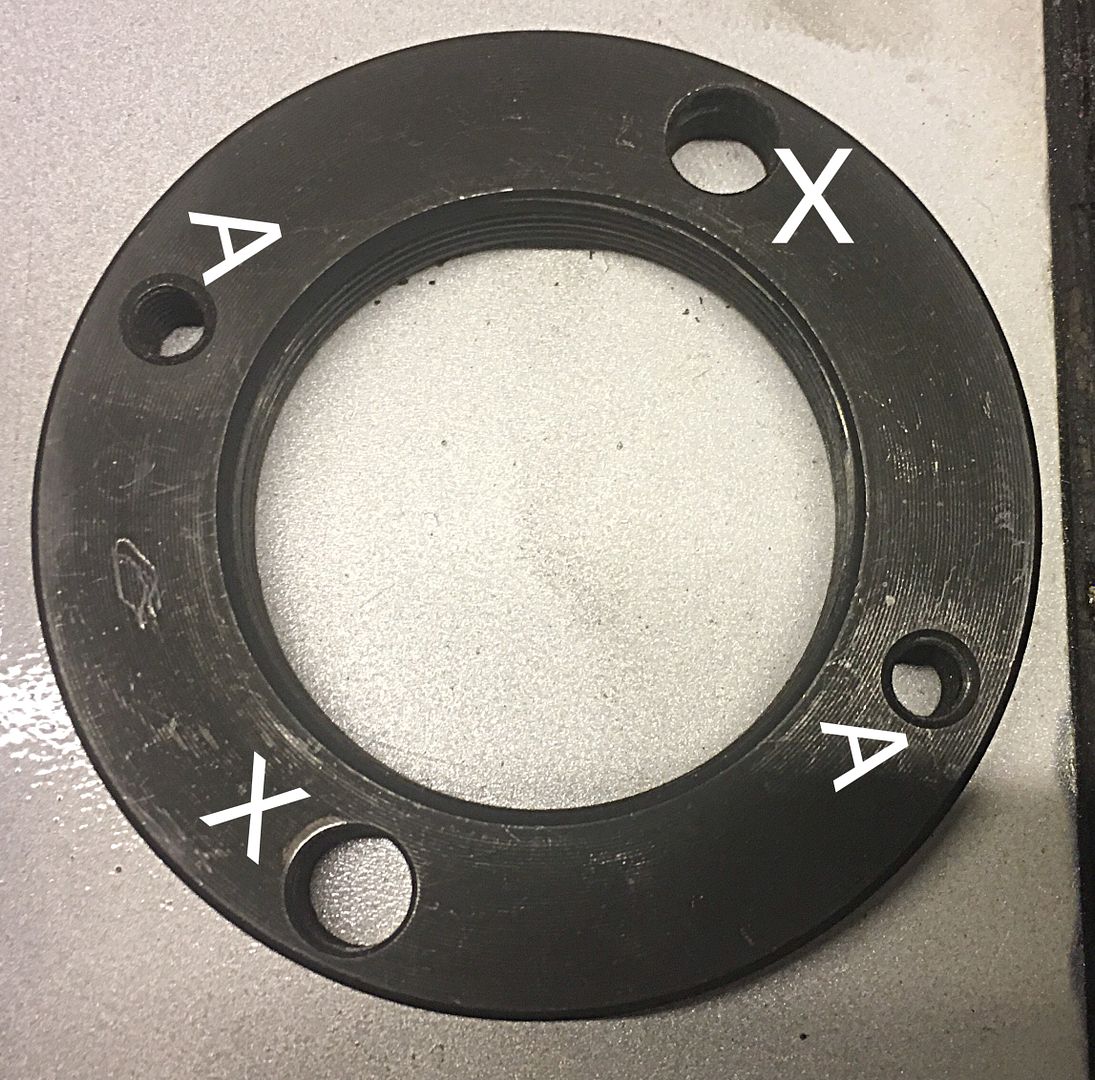
The hub nut looks like this, it is threaded for the hub shaft and has two holes ( X ) for assembly and two threaded holes ( A ) for the locking ring screws.
_________________
Artificial intelligence is no match for natural stupidity.... |
|
| Back to top |
|
|
Derek
Lifetime member
Joined: 13 Mar 2004
Posts: 453
Location: Beeston Regis
|
| Posted: Sat Oct 27, 2018 10:15 Post subject: |
|
|
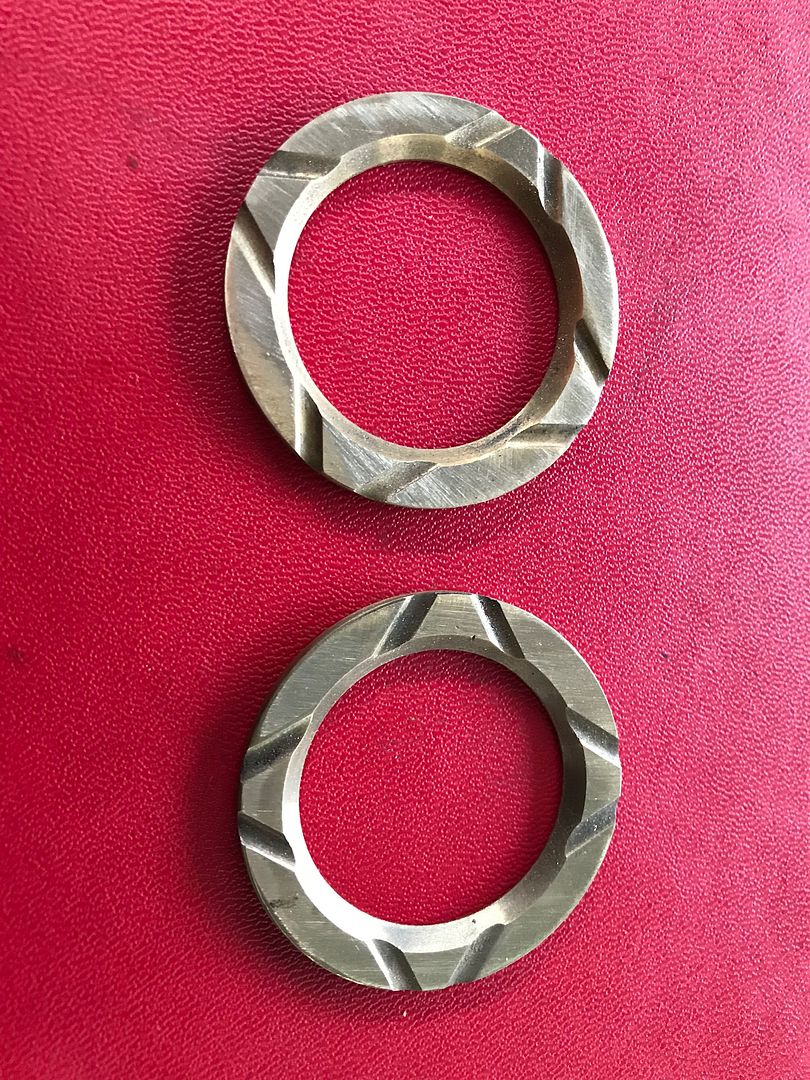
I didn't need to remove the shafts as I was only changing the discs and backplates so the grooved washer stayed where it was.
My method of "torquing" the hub nut was to get it very tight using the two bolts, go for a very short run, (enough to warm up and bed in the bearings), then recheck and adjust to "just free" as quoted in the manual.
The disc were so tight on the hub that I had to rest the assemblies on wooden blocks then, with a thick ally plate over the hub, wallop it with a sledge hammer 
_________________
1996 PE8W, 1994 PF8W*2, Gilera Fuoco, and a Smart Electric Drive. |
|
| Back to top |
|
|
YOZA
Joined: 07 Mar 2005
Posts: 2423
Location: The centre of the universe
|
| Posted: Sat Oct 27, 2018 16:17 Post subject: |
|
|
On my second attempt i used the two M6 tapped holes you pointed out and drove two bolts through with my cordless drill, on number1 speed there was plenty of torque and giving each bolt a turn or two alternately saw the disc slide off easily, scraping all the crud off the hub as it did so.
_________________
Artificial intelligence is no match for natural stupidity.... |
|
| Back to top |
|
|
Derek
Lifetime member
Joined: 13 Mar 2004
Posts: 453
Location: Beeston Regis
|
| Posted: Sat Oct 27, 2018 17:21 Post subject: |
|
|
Yeh, tried that but the bolts' threads started giving way :o
_________________
1996 PE8W, 1994 PF8W*2, Gilera Fuoco, and a Smart Electric Drive. |
|
| Back to top |
|
|
Deker
Joined: 08 Mar 2008
Posts: 3833
Location: Borehamwood
|
| Posted: Sat Oct 27, 2018 17:33 Post subject: |
|
|
 As you screw down the bolts, give them a tap with a hammer, don't go mad - just a bit at a time. As you screw down the bolts, give them a tap with a hammer, don't go mad - just a bit at a time.
Mr D |
|
| Back to top |
|
|
|


