| View previous topic :: View next topic |
| Author |
Message |
Andy W
Joined: 03 May 2015
Posts: 560
Location: Brighton
|
 Posted: Sun Dec 04, 2016 18:15 Post subject: Rear Trailing Arm Twisted??? Posted: Sun Dec 04, 2016 18:15 Post subject: Rear Trailing Arm Twisted??? |
 |
|
I pulled out the fuel tank this sunny afternoon to fit an auxiliary heater fuel connection to it and was able to have a good look around underneath.
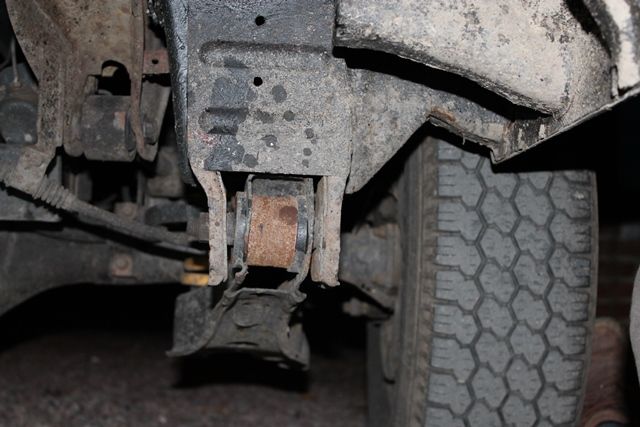
Looking back to the rear axle, the rear near side trailing arm looks as if it is twisted where it connects to the chassis whereas the off side looks perfectly square. When I refitted the rear axle etc. in the summer I had to use pry bars a podger and a 1/2T ratchet strap to pull everything into line to get it all bolted up - quite a mission! Since then I have driven about 6000 miles and the tyres are not showing any signs of excessive or uneven wear and the van itself drives and handles just fine.
The mounts on the axle were nice and square, I didn't check them but took a lot of time stripping, cleaning and painting it, so I think I would have noticed if they were out of square or damaged. The same goes for the trailing arms, they were stripped, cleaned and painted but not checked for squareness/twisting but having cursory glance they looked fine. Another point is that all the bushes had been replaced by the previous owner just before I purchased the van; I had to replace the near side bush and it was absolutely solid and a mission to get out, so I assumed that they had given up trying to get it out but maybe it was replaced and wore out quickly.
Seeing things like this though bother me as something is not right - has anyone any thoughts on this?
Near Side Arm
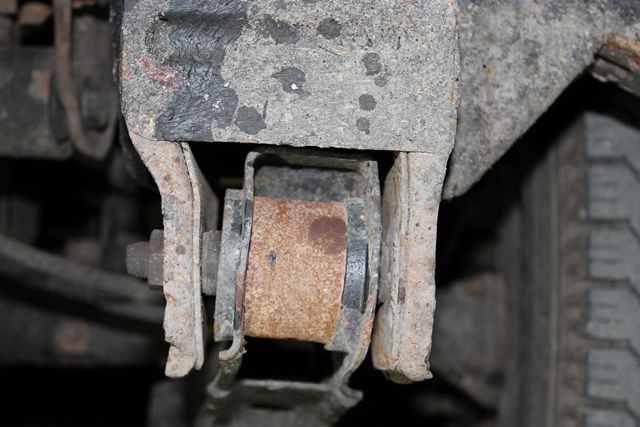
Near Side Arm Close Up
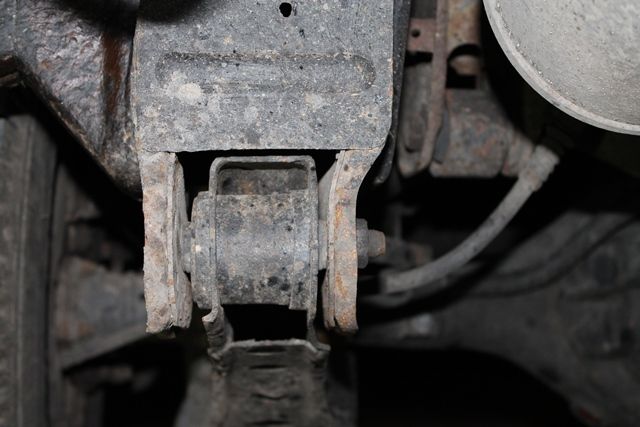
Off Side ARm
_________________
1994 LWB Super Exceed L400, Black & Silver |
|
| Back to top |
|
 |
Google
Sponsor

|
| Posted: Sun Dec 04, 2016 18:15 Post subject: Google Ads keep this community free to join! |
|
|
|
|
| Back to top |
|
|
Green Grouch
Lifetime member

Joined: 14 Feb 2012
Posts: 1264
Location: Dorset
|
| Posted: Sun Dec 04, 2016 18:28 Post subject: |
|
|
In the 2nd picture down, it looks like the round flange that holds the bush has come away from the trailing arm.
It could have been a fitting error?
I replaced mine recently and can see where you could get it wrong. Refitting the arm. A lot of force is needed in the right area to get the arm back into the bolt position.
Took me 40 mins to do one side and just three mins to do the other when I got the technique.
Either that, or its some previous off roading but it's Def not right. 
_________________
A Little Knowledge is Dangerous and expensive! especially if your me Mending anything!! |
|
| Back to top |
|
|
Andy W
Joined: 03 May 2015
Posts: 560
Location: Brighton
|
| Posted: Sun Dec 04, 2016 18:45 Post subject: |
|
|
Cheers, the bush is definitely in properly and supported by both flanges of the arm. I tried pressing out the old bush, but the hydraulic press at school is only a small one and I ended up breaking it! So I used a hole saw to cut out the rubber and then was able to press it out on another small press - I am uncomfortable with applying lots of heat to suspension components.
I made up a spacer to go between the two flanges so when I pressed it in, the flanges didn't bend into each other. From memory, the bush is a stepped bush, but if that is the case then I wouldn't be able to press it in the wrong way round as it wouldn't fit.
I still have to replace the rear Land Rover springs as they are too soft and still haven't seated yet; we had five adults and two babies in yesterday plus we managed to fit a 7' Christmas tree in and the van was definitely sitting low at the back so I still need to source some stiffer springs. I guess I will look into it more accurately when I replace the springs and maybe try and source another trailing arm at the same time.
Andy
_________________
1994 LWB Super Exceed L400, Black & Silver |
|
| Back to top |
|
|
andyman
Joined: 08 Dec 2012
Posts: 5602
Location: Penrith
|
| Posted: Sun Dec 04, 2016 20:02 Post subject: |
|
|
Is it possible the previous owner used a big hammer/lot of force to replace the bush? Distorting the arm as he did so ?
_________________
Andy C L300 Super Exceed - over 100 smiles per gallon! |
|
| Back to top |
|
|
Andy W
Joined: 03 May 2015
Posts: 560
Location: Brighton
|
| Posted: Sun Dec 04, 2016 20:47 Post subject: |
|
|
Maybe, but it would have to be a hell of a big hammer I would think!
_________________
1994 LWB Super Exceed L400, Black & Silver |
|
| Back to top |
|
|
buzr6mille
Lifetime member

Joined: 11 Jul 2009
Posts: 6879
Location: Wherever i park up.
|
| Posted: Sun Dec 04, 2016 21:28 Post subject: |
|
|
You need a new arm, the sides are bent/ twisted, maybe a press was used to force the bush in 
_________________
2nd gear low and go go go!
It's A Shame That Stupidity Isn't Painful..
One dent at a time... |
|
| Back to top |
|
|
Lewis
Site Admin

Joined: 25 May 2006
Posts: 16298
Location: Huddersfield
|
| Posted: Mon Dec 05, 2016 0:07 Post subject: |
|
|
| Andy W wrote: |
| From memory, the bush is a stepped bush, but if that is the case then I wouldn't be able to press it in the wrong way round as it wouldn't fit. |
Quite right, they are stepped bushes; and different sizes for each end. You can see photos on my springs and trailing arm post here:- http://www.MDOCUK.co.uk/forums/viewtopic.php?t=46083
Looking at those I suspect that a previous owner did not use a spacer when refitting the new bushes. I made one out of the shell of the old bushes I removd.
Personally if those were mine I would replace them with new ones, which come complete with new bushes. I have replaced mine, after getting an advisory on the quality of the rubber in the bushes at my last MoT in May. :D
_________________
Copyright is retained for all my photos. Please don't copy them without asking permission
Do not blindly go where the path may lead you. Go where there is no path and leave a trail that others may follow!
ルイス
Last edited by Lewis on Thu Jun 08, 2017 0:23; edited 1 time in total |
|
| Back to top |
|
|
Andy W
Joined: 03 May 2015
Posts: 560
Location: Brighton
|
| Posted: Fri Dec 09, 2016 11:11 Post subject: |
|
|
Cheers, when my budget goes back up again (it Can't go down from where it is!) I will get the rear springs sorted and check out the trailing arms properly with a view to replacing them if needed. Can you remember how much you paid for yours when you replaced them?
Andy
_________________
1994 LWB Super Exceed L400, Black & Silver |
|
| Back to top |
|
|
Lewis
Site Admin
Joined: 25 May 2006
Posts: 16298
Location: Huddersfield
|
| Posted: Fri Dec 09, 2016 11:44 Post subject: |
|
|
MB932790 - Trailing arm Complete with bushes - £176.64 each +VAT 

_________________
Copyright is retained for all my photos. Please don't copy them without asking permission
Do not blindly go where the path may lead you. Go where there is no path and leave a trail that others may follow!
ルイス |
|
| Back to top |
|
|
Andy W
Joined: 03 May 2015
Posts: 560
Location: Brighton
|
| Posted: Fri Dec 09, 2016 14:14 Post subject: |
|
|
Cheers Lewis
_________________
1994 LWB Super Exceed L400, Black & Silver |
|
| Back to top |
|
|
kev1nlm
Joined: 01 Mar 2014
Posts: 183
Location: Holmfirth
|
| Posted: Fri Dec 09, 2016 17:59 Post subject: |
|
|
| Where are they from Lewis? |
|
| Back to top |
|
|
Lewis
Site Admin
Joined: 25 May 2006
Posts: 16298
Location: Huddersfield
|
| Posted: Fri Dec 09, 2016 18:14 Post subject: |
|
|
Mitsubishi dealer parts dept. :D
_________________
Copyright is retained for all my photos. Please don't copy them without asking permission
Do not blindly go where the path may lead you. Go where there is no path and leave a trail that others may follow!
ルイス |
|
| Back to top |
|
|
kev1nlm
Joined: 01 Mar 2014
Posts: 183
Location: Holmfirth
|
| Posted: Fri Dec 09, 2016 18:56 Post subject: |
|
|
| Okie dokey thanks :D |
|
| Back to top |
|
|
kev1nlm
Joined: 01 Mar 2014
Posts: 183
Location: Holmfirth
|
| Posted: Fri Dec 09, 2016 19:23 Post subject: |
|
|
| Are there no suppliers that do aftermarket ones? |
|
| Back to top |
|
|
Lewis
Site Admin
Joined: 25 May 2006
Posts: 16298
Location: Huddersfield
|
| Posted: Fri Dec 09, 2016 19:45 Post subject: |
|
|
Only scrappers, though you will still need to swap the bushes yourself.
There is insufficient a market for independents to go to the expense of making them. Mitsubishi still produce them for the 2WD versions sold in the philippines.
_________________
Copyright is retained for all my photos. Please don't copy them without asking permission
Do not blindly go where the path may lead you. Go where there is no path and leave a trail that others may follow!
ルイス |
|
| Back to top |
|
|
kev1nlm
Joined: 01 Mar 2014
Posts: 183
Location: Holmfirth
|
| Posted: Fri Dec 09, 2016 19:51 Post subject: |
|
|
Oh well never mind, thanks for the info  |
|
| Back to top |
|
|
beeswax
Joined: 22 Feb 2014
Posts: 18
Location: Hull
|
| Posted: Wed Jun 07, 2017 22:41 Post subject: |
|
|
After successfully replacing my lower wishbone bushes last week, I'm now doing my trailing arm bushes.
I used basically the same technique to remove all old bushes:
1. plumbers torch flame inside the thick inner tube (where the bolt goes) until the rubber around it begins to smolder/bubble (30-40 secs) then tap it out easily with a 1/2" socket extension bar and hammer. Quick and clean.
2. sabre saw with fine toothed metal blade lubricated with lots of WD40 (this really seemed to help :D ) to cut a segment of the rubber through to the bush's thin outer casing, removing only enough rubber to give enough elbow room to carefully saw through the outer casing without cutting into the arm sleeves.
3. set too with the cold chisels, smaller extension bar punch, etc. to tease the bush out of the arm. All the trailing arm bushes seat into two rings (unlike the lower wishbone bushes that are fully enclosed in one sleeve), I could belt the outside face of the bush casing with the cold chisel inline with the cut on the inside; to bend and fold the bush casing inwards, effectively collapsing the casing until it fell out!
4. Whilst the wishbone bushes were harder to get out, pushing the new ones in was fairly straight forward: local tyre fitter's shop press, 41mm socket, WD40, two pairs of hands, 8 tons of pressure and beer money.
Both front bushes needed 8 tons, even the one that snapped the fitter's bench-vice in two. So I'm now looking at how to support the sides of the trailing arm to withstand that kind of pressure when pressing the new "step bushes" in. Unfortunately I have no immediate access to suitable bench and tools to follow Lewis' method of opening out an old bush casing; though interestingly my wishbone front bushes (MR112710) seem to be just the right (50mm) height to fit between the sides of the trailing arm at both ends that need support.
So I'm thinking "why not weld some bits of steel plate onto the underside of the arm to support the sides near the bushes?" Lewis' photo below, shows that the trailing arm is basically a pressed (upside down) U section with a flat plate (with five assorted drain holes in it) welded across the bottom. For some reason though, this plate stops short of the bushes at either end of the arm. If it didn't we would not have this support problem.
Can anyone think of a good reason not to modify my trailing arm by welding a couple of support plates (maybe only 30mm wide) beneath the bush-mountings?
_________________
dog limousine : 1998 L400 S2 exceed |
|
| Back to top |
|
|
beeswax
Joined: 22 Feb 2014
Posts: 18
Location: Hull
|
| Posted: Thu Jun 08, 2017 11:06 Post subject: |
|
|
Regarding Andy W's original question - I know it's 6 months ago, but the root of your problem might still be there.
From photos 1,2 and 3 it appears to me that:
1. The bolt is not parallel to the bush casing. Most likely the bush has either failed or been misaligned when installed.
The rubber layer in each trailing arm bush comprises 4 segments: two opposed "hollows" or air pocket segments and two opposed solid rubber segments. The hollows should be aligned horizontally (along the arm) so that the solid rubber segments give maximum resistance to vertical movement. Thus the trailing arm bushes offer more resistance to 'roll' and less resistance to 'yaw' movement of the trailing arm ('pitch' resistance is done by the coil spring, etc.).
2. The bush bolt clamps the bush between the 'jaws' of the chassis bracket (ie not the trailing arm). In both photos 1 and 2 the left hand (offside) wall of this bracket appears to be out of square compared to photo 3. In photo 2, just below the bush-bolt-nut, there appear to be some dents in this bracket so it looks like it has taken a hefty knock that may be also bent the bracket inwards. (The direction of such a knock is interesting - may be done by reversing over something solid)
... or it could simply be that the weight of the vehicle on the knackered bush is pulling the bracket out of true, in which case it should have settled back to square when you replaced the knackered bush 6 months ago.
How does the bracket look now that you replaced the bush ?
HTH
_________________
dog limousine : 1998 L400 S2 exceed |
|
| Back to top |
|
|
|


